
Creating a clean, well-defined outdoor space starts with thoughtful groundwork. Whether designing a pathway, accenting a garden, or covering bare soil, using rock adds texture and structure. With the right approach, the results can be both practical and visually appealing.
Knowing how to spread landscaping rock correctly can make the difference between a lasting surface and one that quickly becomes uneven or messy. Planning, preparation, and precision all play a role in building a reliable foundation. Once everything is in place, the space becomes easier to maintain while enhancing the overall layout of the yard.
Plan the Layout in Advance
Start by defining exactly where the rock will go and how the space should look when finished. Measure the dimensions carefully, then sketch a rough outline that includes edges, existing plants, and any permanent features. This step helps create a clear picture of the area and guides all other decisions.
A well-drawn layout also makes it easier to calculate the amount of material required for full coverage. Taking the time to plan removes guesswork and helps everything come together more smoothly. Early in the process, landscape rock becomes a central element in building outdoor areas with shape, texture, and structure.
Clear the Area Before Starting
Start with the removal of grass, roots, and debris to avoid uneven layers later. A flat shovel or similar tool works well for stripping the surface and clearing organic material. Remove any larger rocks or branches that could interfere with layering.
Smooth, compact soil creates a firm base and limits future movement of materials. Tamp down the area thoroughly until the surface feels level and solid. Preparing the surface carefully supports the final look and keeps everything secure over time.
Install a Stable Base Layer
A solid base helps materials sit well and reduces movement. Use crushed stone or fine gravel to create a base around two inches deep. Spread it evenly with a rake, then compact it to form a uniform surface.
Weed fabric goes above the base layer to discourage growth underneath the rocks. Cut it to match the layout and fasten it with garden staples. This added layer helps the garden rock rest cleanly above the prepared ground without interference.
Add Borders for a Defined Shape
Physical edging gives form to the rock bed and helps hold materials in place. Choose from metal, wood, or natural stone for the border material. Place edging along the entire perimeter of the area and keep the lines smooth.
Press borders firmly into the ground and ensure they sit at a consistent height. Once the shape is outlined, the rock can go in without spilling over the edges. Installing borders also separates the space from the rest of the yard clearly.
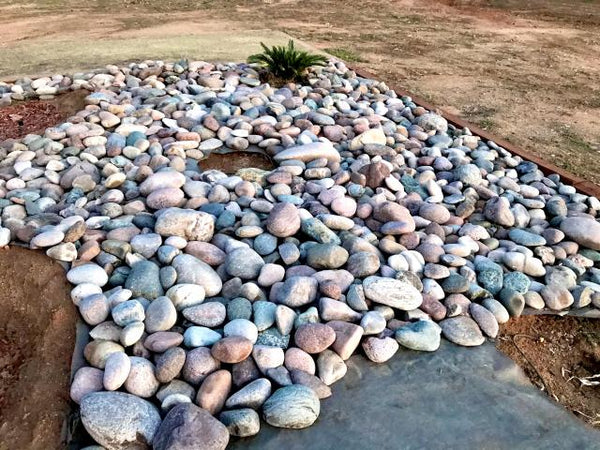
Distribute Rock Evenly Across the Surface
Once the groundwork and edging are finished, bring in the rock using a wheelbarrow or buckets. Begin in one corner and pour small sections at a time. Use a garden rake to spread the rock in even layers. To maintain consistency and ease of use, follow these tips:
- Choose uniform rock size for a smooth surface
- Rake gently to avoid shifting the fabric
- Check edges frequently for overflow
Find Bulk Stone from Reliable Sources
Getting the right amount of material matters just as much as proper installation. Ordering in bulk makes it easier to cover larger areas evenly without mixing different types or sizes. It also helps keep the color and texture consistent across the entire surface. Choosing a store that focuses on bulk landscaping rock can streamline the process and help the project stay on track from start to finish.
Following a clear process from planning to layering ensures every part of the design stays in place. Each element contributes to the finished look, from base material to edging and surface raking. Taking the time to handle each step with care results in a clean layout that supports both form and function in any yard.